In this post I'll give a brief introduction to the BBC micro:bit and walk you through an implementation of the classic game Snake on the micro:bit's retro-looking 5x5 display.
Why Snake?
Snake is a great fit for a "Hello, World" program for the micro:bit, since it can work on the small resolution display and we can make due with the two buttons on the board.
Why Python?
There are three main programming languages we can use with the micro:bit:
-
Blockly: a visual programming language, primarily targeted at children for educational purposes
-
Javascript: a multi-paradigm scripting language, mainly used on the client-side in web applications
-
Python: a multi-paradigm scripting language, designed for simplicity and code readibility
I've picked Python, because its syntax most-closely resembles human language and tends to be understandable, regardless of previous programming experience.
Oh, and also... well... Python is a snake, isn't it?
Let's get started!
One of the ways to code our micro:bit would be to write our program in the recommended text editor, press Download and upload the code using the provided micro USB cable to test it.
While this is a great way to start, when we get into more complex programs we may want an easier way to debug our code before compiling and uploading. Thankfully, Pete Dring from blog.withcode.uk has taken the time to create a browser-based Python IDE with a micro:bit simulator built-in.
There are only three things we need to do to get set-up:
-
Visit create.withcode.uk
-
Type in our import statement for the micro:bit library on the first line:
from microbit import *- Press the green run button to see our simulator pop-up:
Our Player
In the game of Snake, the player is represented by a line of pixels, which starts at length 1 and grows over the course of the game. The snake moves in a single direction constantly, until a button is pressed to change it. To represent the snake, we can simply create a list of tuples (points) for each pixel:
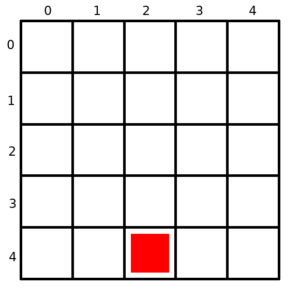
snake = [(2, 4)]As you can see, I have initialised the snake at the coordinates of (2, 4). These coordinates will correspond with the coordinate system of the micro:bit itself, which looks like this:
For the direction, we can simply express it as a number from 0 to 3:
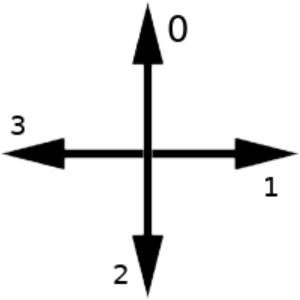
direction = 0This is chosen arbitrarily, but in my case 0 represents movement in the direction of negative Y, 1 in the direction of positive X, 2 in positive Y and 3 in negative X, like so:
The other value we need to store is the player's score, which is also just a simple integer, starting at 1:
score = 1Food
The point of the game is to collect food and grow the snake. Our "food" will just be another pixel on the board, which starts at (1, 1). After it has been eaten, another piece of food will be randomly assigned coordinates.
food = (1,1)Time
In my version of the game, when the player collects food, the speed of the snake increases. The way we are going to do this is by introducing a delay variable, which will start at 1000 milliseconds:
delay = 1000The Game Loop
At the core of all games, there exists a game loop. It's an infinite loop with three responsibilities:
-
Check for user input.
-
Update the game state.
-
Render to the display.
Here it is, represented as code:
running = True

while running:
    # Input
    # Update
    # Render
Taking Input
Our control scheme is going to be quite simple: the left button will move the snake's direction counter-clockwise, while the right button will move it clockwise.
In order to programmatically get the micro:bit's button presses, we will use the functions button_a.get_presses() and button_b.get_presses(). What these do is return the number of times a button has been pressed since the last call of the function. Button A is micro:bit's way of referring to the left button and button B to the right one.
Since our direction value needs to wrap around when we try to increase/decrease it past 3 or 0, respectively, our code will look like this:
direction = (direction + 4 - button_a.get_presses()) % 4
direction = (direction + button_b.get_presses()) % 4
As you can see, in the counter-clockwise direction we are essentially adding the "inverse" of the number. We can have this notion of inverse, because of the aforementioned property of our direction to wrap around.
Moving the Snake pt. 1
First of all, we will store the coordinates of the head of the snake in local variables for easier access:
x, y = snake[0]The snake's movement will be split into two parts. First one will be attaching a new "head" to the front of the snake in the direction of movement, while the second one will be removing the last segment from the snake. The reason for this split is because feeding the snake will make the second part unnecessary.
Here's the code for direction 0:
if (direction == 0):
    if (y != 0):
        snake.insert(0, (x, y - 1))
    else:
        snake.insert(0, (x, 4))
If we haven't reached the end of the display, we add a new head segment to the front, else we add it to the opposite side of the display. This is how we wrap around.
And here is the code mirrored to the other three directions:
elif (direction == 1):
    if (x != 4):
        snake.insert(0, (x + 1, y))
    else:
        snake.insert(0, (0, y))
elif (direction == 2):
    if (y != 4):
        snake.insert(0, (x, y + 1))
    else:
        snake.insert(0, (x, 0))
elif (direction == 3):
    if (x != 0):
        snake.insert(0, (x - 1, y))
    else:
        snake.insert(0, (4, y))
Feeding and Movement pt. 2
Checking for collision with the food is simple - we just compare coordinates of the snake's head with those of the food.
If they collide, we increment the score, create a new randomly-positioned piece of food and decrease the game delay.
If they don't collide, we pop the last segment off the snake and complete the second part of the movement.
if (food == (x, y)):
    score += 1
    food = (random.randrange(5), random.randrange(5))

    if (delay >= 500):
        delay = delay - 50
else:
    snake.pop()
The start delay, minimum delay and delay decrement amount can be adjusted according to preference.
To make the random.randrange() function work, we also need to import the random module at the start of our program:
from microbit import *
import random
Self-collision
The losing condition for the game will be a self-collision of the snake's head with any other segment. This is accomplished with a simple for-loop:
for point in snake[1:]:
    if (point == snake[0]):
        running = False
If you are confused about the Python list slicing notation used (snake[1:]), here's a stack overflow link.
Rendering
Displaying the game state each frame consists of clearing the screen, displaying each snake segment and displaying the food:
display.clear()
for point in snake:
    display.set_pixel(point[0], point[1], 9)

display.set_pixel(food[0], food[1], 9)
The micro:bit functions we are using here are display.clear(), which is self-explanatory and display.set_pixel(), which takes as input an X coordinate, Y coordinate and a pixel intensity from 0-9. For simplicity, we are only using 9 to represent filled and 0 to represent empty.
Tick
And the last action of our game loop is to "tick" the in-game clock by pausing for the pre-set delay:
sleep(delay)For those not familiar with game development, this is a practical simplification, since you may notice that our frame-rate is tied to the clock-speed of the CPU. For bigger and more hardware-intensive games, a concept called delta time is used.
Minimum Viable Product (MVP)
At this point, we have our first playable version of the game!
The current code in its entirety looks like this:
from microbit import *
import random

snake = [(2, 4)]
direction = 0
score = 1
food = (1,1)
delay = 1000
running = True

while running:
    # Input
    direction = (direction + 4 - button_a.get_presses()) % 4
    direction = (direction + button_b.get_presses()) % 4

    # Update
    x, y = snake[0]

    if (direction == 0):
        if (y != 0):
            snake.insert(0, (x, y - 1))
        else:
            snake.insert(0, (x, 4))
    elif (direction == 1):
        if (x != 4):
            snake.insert(0, (x + 1, y))
        else:
            snake.insert(0, (0, y))
    elif (direction == 2):
        if (y != 4):
            snake.insert(0, (x, y + 1))
        else:
            snake.insert(0, (x, 0))
    elif (direction == 3):
        if (x != 0):
            snake.insert(0, (x - 1, y))
        else:
            snake.insert(0, (4, y))

    # Feeding Check
    if (food == (x, y)):
        score += 1
        food = (random.randrange(5), random.randrange(5))

        if (delay >= 500):
            delay = delay - 50
    else:
        snake.pop()

    # Collision Check
    for point in snake[1:]:
        if (point == snake[0]):
            running = False

    # Render
    display.clear()
    for point in snake:
        display.set_pixel(point[0], point[1], 9)

    display.set_pixel(food[0], food[1], 9)

    # Tick
    sleep(delay)
We can test this version either by compiling using the "Download HEX" button on the right and sending it to our micro:bit using micro USB or just playing it right there in the browser with the green "Run" button.
Next Steps and Improvements
Currently, we are keeping track of the score, but have no way of displaying it to the player. We could possibly do this using either display.scroll() or display.show(), which help us put scrolling text or sequential characters on the screen.
Other improvements we could make might be adding an introductory message, replacing some of the magic numbers in our code with named constants or even using the micro:bit's file system to store previous high-scores.
Here's one of my "cosmetically enhanced" versions of the code - GitHub link.
And here's a short video of me playing the game:
If you would like to learn more about the micro:bit or grab one for yourself or as a gift to a younger future programmer, visit the website.
Thank you for reading and I hope you got something out of this post!